How Does Linting Work?
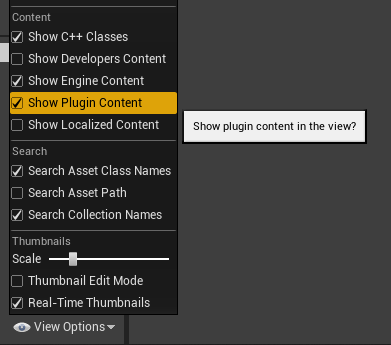
Linter's bundled rulesets are included in the Linter Plugin content folder. Engine and Project plugin folders might be hidden in your engine. To show them, make sure the checkboxes next to Show Engine Content and Show Plugin Content are both checked in your Content Browser's View Options.
Dissecting a Linter Rule Set

Linters are defined by LintRuleSets, essentially a fancy Data Asset. In the above example, we are looking at the MarketplaceLintRuleSet asset which defines all of the rules we want to use when scanning for marketplace guideline compliance.

In the above image you'll see that this LintRuleSet uses a NamingConvention Data Asset named MarketplaceNamingConvention In addition to a NamingConvention asset, LintRuleSet assets also contain something called a Class Lint Rules Map. This is a map of Unreal Engine 4 classes paired with a list of LintRules, which are assets that make up individual rules that we'll cover later.
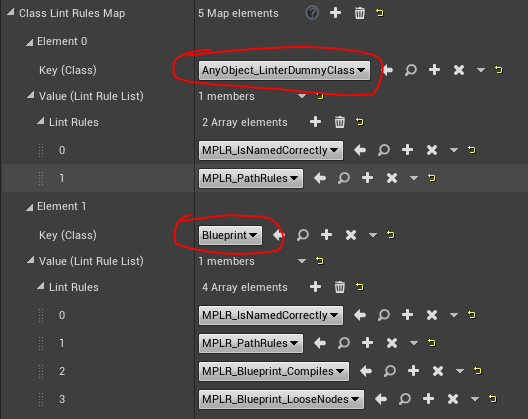
When objects in an Unreal Engine 4 project are linted, they are scanned using the rules that match the "most specific" class defined in the Class Lint Rules Map. You can use any class in this map, with the base UObject being a special case.
Unfortunately at this time the Unreal Engine 4 editor does not allow UObject as a valid value as a key in this Class Lint Rules Map, so if you want to define rules that you want to scan UObjects with, please use the AnyObject_LinterDummyClass class instead.
With the above example ruleset, when the Linter comes across a UBlueprint asset it will scan that asset using the four lint rules defined above. This is because UBlueprint is a more specific class definition than UObject. Another asset type, such as a data asset, will instead use the AnyObject_LinterDummyClass rules when being scanned unless there is a more specific matching class defined in the ruleset than UObject.
NOTE: Currently there isn't support for allowing cascading rule checks, i.e. allowing a UBlueprint being scanned against rules paired with UBlueprint as well as UObject. This support is planned to be added in a future release. See todo.
How Lint Rules Are Implemented
While LintRules can be implemented in both Blueprint and C++, currently there aren't too many functions exposed to Blueprint that deal with asset metadata and lower level asset management checks and tasks. It is currently strongly recommended that you do your rule checking logic in C++ and then only expose configuration settings to a Blueprint class.
All of Linter's bundled LintRules are Blueprint child classes that parent from a native C++ LintRule, with the goal that the Blueprint LintRules only expose configuration options.
PassesRule_Internal_Implementation
The core of implementing your own LintRule is to implement the PassesRule_Internal_Implementation function. This function can be implemented in either C++ or Blueprint as this is a BlueprintNativeEvent.
This should be where the business logic of your LintRule operates. To report a rule violation, push a new FLintRuleViolation to the OutRuleViolations array and return false. You should always return false if any rule is violated and you should always return true if no rules were violated. A FLintRuleViolation is simply a struct that has a reference to the asset that is violating the rule, a reference to the rule that is being violated, and potentially any additional optional recommended text to display to the user reading the Lint Report.
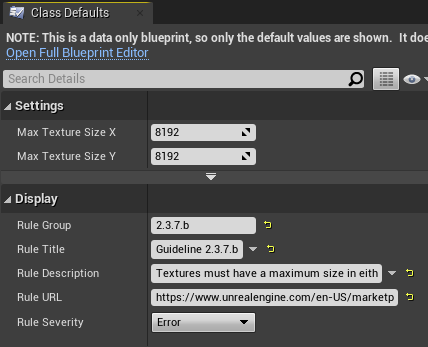
Implementing this function is all you need for your LintRule to be functional and ready for use. For the sake of example, here is how the Unreal Engine Marketplace Guideline rule for ensuring your textures are not too big is implemented:
bool ULintRule_Texture_Size_NotTooBig::PassesRule_Internal_Implementation(UObject* ObjectToLint, const ULintRuleSet* ParentRuleSet, TArray<FLintRuleViolation>& OutRuleViolations) const
{
    const UTexture2D* Texture = CastChecked<UTexture2D>(ObjectToLint);

    int32 TexSizeX = Texture->GetSizeX();
    int32 TexSizeY = Texture->GetSizeY();

    // Check to see if textures are too big
    if (TexSizeX > MaxTextureSizeX || TexSizeY > MaxTextureSizeY)
    {
        FText RecommendedAction = NSLOCTEXT("Linter", "LintRule_Texture_Size_NotTooBig_TooBig", "Please shrink your textures dimensions so that they fit within {0}x{1} pixels.");
        OutRuleViolations.Push(FLintRuleViolation(ObjectToLint, GetClass(), FText::FormatOrdered(RecommendedAction, MaxTextureSizeX, MaxTextureSizeY)));
        return false;
    }

    return true;
}
In the above code, we simply check to see if the ObjectToLint is a texture with width or height exceeding a MaxTextureSizeX/MaxTextureSizeY, which is defined in our Blueprint child as 8192. This allows us to easily scan for textures that are bigger than 8k. If we ever want to decrease or increase the size of our textures allowed under this rule, we can easily do so by editing the MaxTextureSizeX/MaxTextureSizeY in Blueprint without requiring any code changes or code compiling.
It is recommended that you create a Blueprint child of your native classes to fill out the Rule's display info. This way the rule can also have verbiage updates without requiring code edits.
PassesRule Is Most Likely Not What You Want
LintRules also have a virtual function called PassesRule. This is not meant for containing the business logic of your LintRule. This is a public BlueprintCallable function that allows your LintRule to have a Blueprint implementation of PassesRule_Internal_Implementation.
You should only implement this if you want to "early out" of the linting process. Linter's strategy is to try to implement error handling in PassesRule for things like possible null checks or invalid objects and then only performing the actual scan logic inside PassesRule_Internal_Implementation. You do not need to implement your own PassesRule.
IsRuleSuppressed is optional
LintRules can also be programmatically suppressed by implementing the IsRuleSuppressed function. This function is called automatically by the base PassesRule implementation. If you want to simply suppress a rule, do so here instead of PassesRule.
How Lint Naming Conventions Are Implemented
NamingConvention assets are simply a list of naming conventions as a data asset. LintRules will have access to the NamingConvention data asset that is defined in the lint rule's parent LintRuleSet. The NamingConvention data asset isn't responsible for any implementation logic. Instead LintRules are written to perform these naming convention checks using the given NamingConvention data asset as configuration.
LintRuleCollections... collect rules
Sometimes it is easier to treat a collection of rules as a single rule. In this case, you can create a LintRuleCollection class that simply defines a list of other LintRules. This is very useful when dealing with repetitive path and file name lint rules.
Video Walkthrough of Creating A LintRuleSet
@TODO: Get this edited, uploaded, submitted, embedded
Automated Linting via Commandlets
The Linter plugin adds a Commandlet that you can run against your project via commandline. It will return an error code of 1 if the linting process fails for any reason. It will return an error code of 2 if Linter reports any errors, or warnings as well if -TreatWarningsAsErrors is passed on the commandline.
To invoke the commandlet, run your Editor binary (i.e. D:\UE424\Engine\Binaries\Win64\UE4Editor-Cmd.exe), followed by the path to your .uproject (i.e. "C:\Users\Allar\Documents\Unreal Projects\Linterv2Test\Linterv2Test.uproject"), followed by the arg -run=Linter.
Full command for example, D:\UE424\Engine\Binaries\Win64\UE4Editor-Cmd.exe "C:\Users\Allar\Documents\Unreal Projects\Linterv2Test\Linterv2Test.uproject" -run=Linter.
This will run Linter against the /Game path, a.k.a. your project's path, and return error code 0 if there are no errors.
Specifying which Lint Rule Set to use
All Lint Rule Sets now have a filed named Commandlet Name which represents a simple name to identify them via commandline.
The Gamemakin LLC UE4 Style Guide's Commandlet Name is ue4.style, where the Unreal Engine Marketplace Guidelines uses the name marketplace.
To specify this, use the -RuleSet= arg. For example, -RuleSet=ue4.style will use the Gamemakin lint rule set. -RuleSet=marketplace will use the UnrealEngine Marketplace Guidelines. If -RuleSet= is not provided, Linter will use the project's default Lint Rule Set.
Additional Args
Content Paths
You can tell Linter to scan a list of folders to scan. They should generally be in the UE4 path form of /Game/Content/.... If a path includes spaces, wrap it in quotes.
For example, if you only wanted to scan folders Apple and Orange Stuff inside your project's Content folder...
D:\UE424\Engine\Binaries\Win64\UE4Editor-Cmd.exe "C:\Users\Allar\Documents\Unreal Projects\Linterv2Test\Linterv2Test.uproject" /Game/Content/Apple "/Game/Content/Orange Stuff" -run=Linter.
This will scan both the Apple and Orange Stuff folders inside your project's Content folder. You can also pass in Engine and plugin folders. If no path is provided, the default will always be /Game.
JSON Report
To generate a .json report, you can add the switch -json to generate a .json report in your project's Saved/LintReports/ folder. You can override the name of the report via -json=ReportName.json. If you specify a relative path it will be relative to the Saved/LintReports/ folder. You can also provide an absolute path to write the .json report to.
HTML Report
To generate a .html report, you can add the switch -html to generate a .html report in your project's Saved/LintReports/ folder. You can override the name of the report via -html=ReportName.html. If you specify a relative path it will be relative to the Saved/LintReports/ folder. You can also provide an absolute path to write the .html report to.
TreatWarningsAsErrors
If you use the -TreatWarningsAsErrors switch, Linter will return an error code of 2 if the report contains any warnings. By default, Linter only returns an error code if it fails to lint or if the lint report contains errors.